導入
今まではPrcessingのウィンドウの中にGUIパーツを配置してきたが,正直みっともないし,Swingの特徴であるレイアウトも使えないので,コントロールウィンドウを別に作り,そこに配置する.
SwingのウィンドウはJFrameというクラスである.これをそのままオブジェクトインスタンス化してもよいが,一般的にはJFrameクラスを継承してActionListenerインタフェースを実装したクラスを自分で設計して,それを用いる.
つまりインナークラスとして,class MyWindow extends JFrame implements ActionListenerを実装すれば良い.
コード
// SwingInProcessing_JFrame.pde

import java.awt.*;
import java.awt.event.*;
import javax.swing.*;

int xPos, yPos;
boolean inStopMode; //今は止まっているか動いているか

void setup(){
  //Processing Window
  size(640, 480);
  colorMode(RGB, 255);
  frameRate(10);

  ControlWindow controlWindow = new ControlWindow(this);
  // ここでthisというのはメインのクラス.
  // Processingでは自動的にスケッチの名前がメインのクラスにつけられる.
  xPos = 0;
  yPos = 0;
  inStopMode = true;
}

void draw(){
  fill(255, 255, 255, 60);
  rect(0, 0, width, height);

  fill(60, 60, 60, 0);
  ellipse(xPos, yPos, 30, 30);
  if(!inStopMode){
   xPos += 10;
   yPos += 10;
  }
}


void eventsCalledFromControlWindow(String actionCommand){
  // Function calls from controlWindow
  // インナークラス内のイベント受け取り用ActionPerformed関数から呼ばれる関数を定義

  if(actionCommand.equals("startButton_Pushed"))
    inStopMode = false;
  else if(actionCommand.equals("stopButton_Pushed"))
    inStopMode = true;
}


class ControlWindow extends JFrame implements ActionListener{
  // Inner Class it's extends Basic Window Class "JFrame"
  // and implements "ActionListener" for Event
  // インナークラスとして,基本的なウィンドウのクラスであるJFrameを継承し,
  // かつイベントを取得できるActionListenerインタフェースを実装したものを定義する.

  JButton startButton, stopButton;
  JTextField textField;
  JPanel panel; // 一番基本的な表示領域格納をするためのクラス

  // メインのクラスのインスタンスを保持するための変数
  SwingInProcessing_JFrame parentWindow;

  ControlWindow(SwingInProcessing_JFrame parentWindow){
    // Make and Initialize JFrame Object with "window title"
    // 親クラス(JFrame)のコンストラクタを実行する
    super("Control Window");

    // 親となるウィンドウ(メイン)のインスタンスを保持する.
    this.parentWindow = parentWindow;

    // set Size of control window
    // コントロールウィンドウのサイズを決める
    this.setSize(320, 240);
    // "this" keyword is important

    // make button and set with "Border Layout" for the control window
    // ボタンを作りイベントを登録し,"Border Layout"に従い配置する.
    // Border Layoutについては下記
    // https://docs.oracle.com/javase/tutorial/uiswing/layout/border.html
    // Box Layout等も指定できる.

    panel = new JPanel();
    panel.setLayout(new BorderLayout());

    startButton = new JButton("Start");
    startButton.setActionCommand("startButton_Pushed");
    startButton.addActionListener(this);
    panel.add(startButton, BorderLayout.NORTH);
    stopButton = new JButton("Stop");
    stopButton.setActionCommand("stopButton_Pushed");
    stopButton.addActionListener(this);
    panel.add(stopButton, BorderLayout.SOUTH);
    textField = new JTextField("Control Panel Text Field");
    panel.add(textField, BorderLayout.CENTER);

    // JFrameの一番奥の表示格納領域(Content Pane)を持ってきて,
    // そこに今までボタンなどを追加してきたpanelを追加して表示できるようにする.
    this.getContentPane().add(panel);

    // 最後にコントロールウィンドウを可視化する
    this.setVisible(true);
  }

  @Override
  public void actionPerformed(ActionEvent e){
    //外側のクラスの文字列actionCommandにイベントが持ってきたActionCommandを代入
    String actionCommand = e.getActionCommand();

    //ControlWindow内のTextFieldにactionCommandを表示
    textField.setText(actionCommand);

    //親ウィンドウのイベント用関数を呼ぶ
    parentWindow.eventsCalledFromControlWindow(actionCommand);
  }
}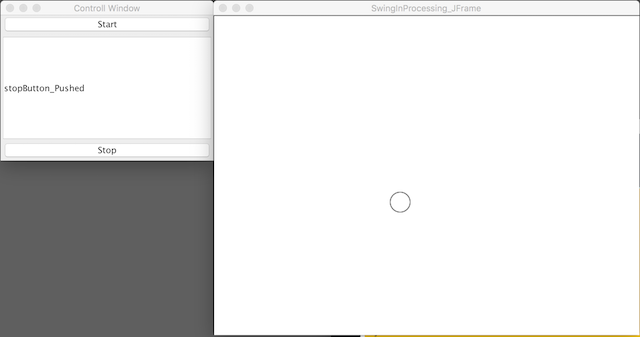
コントロール用のウィンドウが別に表示され,Startボタンでアニメーションスタート,Stopボタンでアニメーションストップ,ボタンのActionCommandがテキストフィールドに表示される.